Het verhaal achter de motorrevisie van mijn E28 M5

Net een nieuwe auto gekocht? Of druk bezig met de restauratie van je klassieker of opbouw van je racer? Hier kun je ons op de hoogte houden.
Plaats reactie
raymondw
Berichten: 887
Lid geworden op: 26 nov 2006, 20:33
Locatie: NL

Re: Het verhaal achter de motorrevisie van mijn E28 M5

Bericht door raymondw » 07 jan 2011, 23:37

ABS issue

Already in 2007, I observed the failure of the ABS system at speeds above 220km/h during road trips through Germany. Then still on a German temporary registration (5-days KKE), there was no need to comply with any vehicle inspection such as MOT, APK, TuV, MFK or whatever.

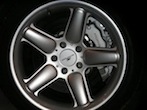
When I decided to register #231 on a Dutch registration I had to resolve the Dutch APK relevant issues for which we performed a pre-registration check up in the winter of 2008. During those inspections, I discovered that the impulse sending wheels of the rear-wheel drive flanges were corroded as can be seen on the following picture.

Afbeelding

This explains for the ABS failure at very high road speeds. However, for obtaining a Dutch registration in May 2008, this was a non-issue, as the RDW institute would not test the car under such extreme conditions. Since #231’s ABS system was fully functional within the legal speed limits in the Netherlands with a margin of 100km/h, this wasn’t a critical issue hence why I placed this issue on the back-log and planned to solve it in the winter of 2009/2010.

Then in June 2008, the engine failure came in between. With the following engine rebuild between March and September 2009, addressing the ABS issue was not important at all and remained low on the priorities list. Granted, I could have combined this the installation of the rebuild engine, but decided against that to obtain focus to the main objectives for that time.

With the running-in phase almost completed, solving the ABS issue is placed higher on the priorities list, especially since the speed at which the ABS warning light illuminates has lowered to about 190km/h on the speedo-meter. This reduces the margin to less then 70km/h from the legal limit. Although this still is more then enough to have my drivers license being put through the ‘shredder’, but with the expected decay, it can become a relevant issue sooner or later and I’d rather resolve it in my own time and not with a fixed time-table to meet the criteria for obtaining the next road-worthy certificate.

I have just received the parts quotation from my dealer and although the drive flanges are just Euro 42,87 each, their status is backorder from factory. With other words, delivery time cannot be confirmed at the moment.

Appearance of the differential

Another issue that bugged me for a long time is the corroded diff-housing that deteriorates the otherwise very clean bottom of #231. Just like the ABS issue, this issue was placed on hold following the earlier mentioned engine failure.

Afbeelding

Since the drive-shafts need to be removed for resolving the ABS issue, this is a good opportunity to improve the differential at the same time, therefore I plan to remove it as well according to the following scheme.

1: Remove drive shafts, inspect them and replace the boots of the universal joints if necessary.
2: Replace drive flanges and solve the ABS issue
3: Remove differential from car
3: Disassembly of the LSD, but leave the pignon-shaft in place because of the required pre-tension
4: Remove the rust and clean the housing.
5: Paint the housing with black POR15
6: Reassemble the differential, use new parts where necessary.

Front shimmy

I already have ordered two new lower control arms for the front suspension to solve the shimmy that I have experienced during recent road-trips. I have decided against after market such as Meyle HD or Lemforder for two reasons.

1: Orginality
2: I am not convinced on Meyle HD on my fathers A6 quattro were I preferred these over OEM. The ride still is a bit deteriorated by mild vibrations, even when new OEM shock absorbers with all the associated parts were installed soon after to eliminate other sources.

Front wheel arch liners

Following the experiences of member BMWWGN’s experiences with his recently acquired South African E28 M5, I decided to check the cover liners of the front wheel arches as well. This resulted in the decision to replace them on #231 as well, including the rubber seals. Fortunately, #231 doesn’t suffer from corrosion in the enclosed area behind these liners so there is no need to do some bodywork there.

All the required parts have been ordered; some of them already have arrived. I will update this thread from time to time and report the progress.

raymondw
Berichten: 887
Lid geworden op: 26 nov 2006, 20:33
Locatie: NL

Re: Het verhaal achter de motorrevisie van mijn E28 M5

Bericht door raymondw » 07 jan 2011, 23:38

Friday afternoon, I picked up the new lower control arms that I have ordered recently to resolve the shimmy issue under braking. I will first replace the lower control arms position 1). If that doesn’t help, I will replace the thrust arms (position 2).

Afbeelding

The reason why I am not replacing the bushings is rather simple. With the shimmy issue, I do not suspect these are to blame. Instead, I suspect that one of the ball joints have failed. These parts are integrated into the control arms, and cannot be bought as separate parts.

Afbeelding

Next to these parts, I will also replace the associated nuts and bolts, some of which I already have on stock due to the minimum order quantity of these parts at BMW. Unfortunately, I didn’t order the new crown-nuts for the ball joints; I will do so tomorrow. With the new control arms, I also get new bushings so that I don’t have to use a hydraulic press to fit them.

The net price for the complete parts is slightly less then 127 Euro ex VAT per side. Add to that the usual discount and I end up at around 100 Euro ex VAT per side. This is more then after market Meyle HD, but as said in the kick off post, I haven’t been convinced about their quality thus far.

Afbeelding

Whilst writing the replacement plan, I got stumbled in the E28 repair CD that does not mention the exact tightening specs for the E28. For that, I turned to an old friend and BMW Guru, member ‘Billie S38’. I will quote them here for reference:

Lower control arm:
- Ball joint: 85Nm
- Bushing to engine subframe: 78Nm

Thrust arm:
- Ball joint: 85Nm
- Bushing to chassis: 130Nm

Last but not least, I also received the new wheel-arch liners that I decided to replace as well after reading member ‘BMWWGN's’ thread about his SA E28 M5.

Afbeelding

These liners are just 5,53 Euro per piece (ex VAT) before discount, so one cannot really bother. This also applies to the rubber seals that are about 1,50 Euro more. Member ‘BMWWGN’ painted them in the matching color, but I have yet to make up my mind.
Laatst gewijzigd door raymondw op 07 jan 2011, 23:42, 1 keer totaal gewijzigd.

raymondw
Berichten: 887
Lid geworden op: 26 nov 2006, 20:33
Locatie: NL

Re: Het verhaal achter de motorrevisie van mijn E28 M5

Bericht door raymondw » 07 jan 2011, 23:38

I picked up the largest part of the required parts for the overhaul of the differential this afternoon. After disassembly, cleaning and finishing the cast iron differential housing, the differential will be reassembled with new seals.

Afbeelding

Although the output shafts of the E28 and E34 are very robust, the rubber boots will perish sooner or later exposing the expensive constant velocity joints to the hostile environment of the outside world we live in. After twenty-five years, it is wise to replace the boots and give the constant velocity joints a proper clean and a fresh supply of grease. BMW offers a complete revision set including the required grease and hylomar adhesive. The set costs 42,75 Euro ex VAT per piece; four are needed for both outputs shafts. Rest assured that a new output shaft is much more expensive then that.

Afbeelding

BMW also listed a sealing set for the differential, but my parts catalogue indicated that only the single parts could be ordered. The following picture shows the seal and the circular clip for the output shaft.

Afbeelding

I plan the tackle this job between Christmas and Boxing Day as I need to finish the E32 first that returned from a week stay at the body shop to repair the sill damage that I discovered some time ago. The rust is the result of poor craftsmanship during a previous repair before we even bought the car (1998.

Afbeelding

After I removed the filling that at some spots was over 5mm thick, the true extent of the damage appeared.

Afbeelding

Repairing such damage goes beyond my capabilities so I outsourced the work to the bodyshop of my brother in law. The final result looks very nice; bear in mind that the sills are covered by plastic liners; oops these need replacement as well, which is $$$ for seven series parts.

Afbeelding

raymondw
Berichten: 887
Lid geworden op: 26 nov 2006, 20:33
Locatie: NL

Re: Het verhaal achter de motorrevisie van mijn E28 M5

Bericht door raymondw » 07 jan 2011, 23:39

Last week, I have finished the E32 by installing the new ill-covers, after which the lift was free for the E28. The E32 has some issues left, but none that can be solved off the ramp. As the snow that has fallen last month, hasn’t melted due to the low ambient temperatures, there is a nice layer of ice in front of my workshop, due to which it was quite a hassle to get the E28 on the lift. When driving on the lift with the front wheels, the rear wheels were still outside and spinned on the centimeter thick layer of ice during which the car’s rear jumped sideways. Eventually, I took a rolling start to get some momentum and that did the trick.
I started with removing both driveshaft’s These will be overhauled with new boots and a new filling of grease for the coupling joints.

Afbeelding

With both driveshaft’s out of the way, I was able to remove the final drive. This is rather easy, but the four 19mm bolts with which the final drive is bolted on the rear sub-frame were tight and I needed a breaker bar to loosen them. Eventually, the bugger came loose, but with a heavy cast iron house, lowering the damn thing didn’t came without protest from my back.

Afbeelding

The plan is to get it back in a visual excellent condition to match the rest of the drivetrains excellent visual condition. The bearings themselves don’t need replacement, so I will just remove the rust and treat it with POR15 before reassembly with new seals.
With the differential out of the way, I have a better position to inspect the cars underside. There is only some surface rust on the sub-frame that will be removed and treated with POR15. There is no need to replace the sub-frame’s bushings; these were all replaced just 7000km ago by a main dealer and are all in excellent condition.

Afbeelding

To diagnose the front wheel shimmy, I have removed the front wheels so I can remove the strut assembly. The plan is to replace the lower control and thrust arms and have the struts themselves sandblasted and powder coated. This also allows me to replace the protective covers of the shock-cylinder and inspect the strut mounts.

Afbeelding

raymondw
Berichten: 887
Lid geworden op: 26 nov 2006, 20:33
Locatie: NL

Re: Het verhaal achter de motorrevisie van mijn E28 M5

Bericht door raymondw » 07 jan 2011, 23:40

Yesterday evening, I removed the right-front strut assembly. Although this is relatively straightforward, bear in mind that unbolting the various nuts and bolts require a significant amount of force and thus your cars should be safely positioned on a ramp. Never, ever try to do this from underneath a car.

Afbeelding

I have yet to disassemble the strut-assembly for which I need spring-compressors. Again, never ever remove the top not holding the upper strut-mount without these. This will cause serious injuries due to the energy stored in the compressed spring.

A first analysis revealed a significant amount of play in the rotational part, both in axial and longitudinal directions. This could be the cause of the shimmy under braking, but for a comparison, I have to remove the left-strut assembly first. Anyhow, these parts will be replaced, together with all the associated parts.

Afbeelding

Unbolting the ball-joint nuts from the strut-base is rather straight forwards, but even with a ball-joint depressor, I wasn’t able to remove them. Therefore, I will remove the entire base-plate with the thrust arms and lower control arms as well and move them to the bench were it is safer to apply a lot more force.

My first thoughts is that the ball joints have lost their stiffness significantly, but for a comparison with the new part, I have to wait until I have removed the old part.

Afbeelding

Apart from some surface corrosion, the strut towers are in fine condition. They will be cleaned and treated with Caprotec RX5 before installing the reassembled struts.

Afbeelding

Gebruikersavatar
Niels
Berichten: 22511
Lid geworden op: 13 feb 2006, 23:04
Auto: Prius+
Locatie: Grunn...

Re: Het verhaal achter de motorrevisie van mijn E28 M5

Bericht door Niels » 08 jan 2011, 00:59

Thanks for sharing :wink:

Gebruikersavatar
Sebring NL
Berichten: 416
Lid geworden op: 31 aug 2010, 13:09

Re: Het verhaal achter de motorrevisie van mijn E28 M5

Bericht door Sebring NL » 08 jan 2011, 03:53

Het werk houdt nooit op Ray!


Volgende keer misschien een iets uitgebreidere beschrijving? :banaan:

Wout

Gebruikersavatar
SteV6
Berichten: 3184
Lid geworden op: 06 aug 2006, 19:26
Locatie: S4 Avant, S5 cabrio, Leon V6, Speedster, Twente

Re: Het verhaal achter de motorrevisie van mijn E28 M5

Bericht door SteV6 » 08 jan 2011, 14:32

Wat een project Raymond!

Heb je de auto wel op taxatiewaarde verzekerd? Want het verschil tussen dagwaarde en werkelijke waarde ligt inmiddels zo ver uit elkaar ...

Veel plezier verder met je wagen. En wie weet komen we elkaar een keertje tegen in Twente. Las net overigens dat je een tijd terug de A31 de Oberhausen Straight noemt, maar volgens mij is dat de bijnaam van de A3 van Arnhem-Oberhausen. A31 is de Brabusteststrecke.


Stephan

FrankS
Berichten: 1320
Lid geworden op: 16 jun 2009, 10:10

Re: Het verhaal achter de motorrevisie van mijn E28 M5

Bericht door FrankS » 08 jan 2011, 14:44

SteV6 schreef:Wat een project Raymond!

Heb je de auto wel op taxatiewaarde verzekerd? Want het verschil tussen dagwaarde en werkelijke waarde ligt inmiddels zo ver uit elkaar ...

Veel plezier verder met je wagen. En wie weet komen we elkaar een keertje tegen in Twente. Las net overigens dat je een tijd terug de A31 de Oberhausen Straight noemt, maar volgens mij is dat de bijnaam van de A3 van Arnhem-Oberhausen. A31 is de Brabusteststrecke.


Stephan
^^ Ik noem de A31 ook altijd de Oberhausen Straight...?

Anyway: Wat een heerlijk leesvoer weer :D

raymondw
Berichten: 887
Lid geworden op: 26 nov 2006, 20:33
Locatie: NL

Re: Het verhaal achter de motorrevisie van mijn E28 M5

Bericht door raymondw » 08 jan 2011, 23:04

Last week, I have removed the left strut, and both strut-base plates with attached control arms. The removal of the strut itself only requires half an hour. Disconnect the ABS sensors, guide their wiring through the inner fender, unbolt the brake caliper from the strut and remove the brake-hose from the strut as well. Then loosen the three 17mm bolts with which the strut is connected to the base plate and loosen the three 13mm nuts that hold the upper strut-mount to the strut-tower.

One word of warning though; unbolting the three 17mm bolts requires a significant amount of force. Make sure that your car is safely jacked up with the appropriate means. I cannot emphasize this hard enough as no car is worth risking your life for.

Afbeelding

To remove both thrust arms, I removed the front stabilizer bar and one strengthening bar. This is required to gain access to the 22mm bolt and nut with which the thrust arm is bolted to the front beams.

Afbeelding

On the right side, I also needed to remove a heat-shield, this is rather straight forward and therefore, I didn’t make a picture.

I already had bought the lower control arms as a possible suspect of the shimmy, but decided against ordering the thrust arms as I wanted to analyze the individual parts first. As can be seen on the following picture, the left thrust arm is made in 1989, and thus most likely installed in the same or following year. Clearly visible are the cracks in the rubber vulcanization of the bushing.

Afbeelding

The right thrust arm is of a more recent date (see following picture), but without any OE or manufacturers markings visible, I can only conclude that this is an after-market part of unknown origin. As a corrective measure, I will replace both thrust arms and bushings with new OE parts.

Afbeelding

The next step is the disassembly of the struts, To remove the springs, a special tool is required to secure the springs when the strut mount is removed. Without this tool, the compressed spring will release its energy to the strut mount launching it into the air with a force that is enough to cause serious injuries.

Afbeelding

Ideally, the three compressors are placed at an angle of 120 degrees from each other, allowing for an evenly compression of the spring. The spring can be compressed by turning the screws with a wrench or ratchet until the spring is compressed enough to loosen the top nut with which the upper strut mount is bolted to the shock absorber. The following picture shows the deteriorated seal of the strut-mounts bearing exposing its ball-bearings.

Afbeelding

As both spring mounts show a similar sort of damage and have ~1mm of radial play and some axial play, it is safe to conclude that this is the main cause of the shimmy. Both parts will be replaced with factory OE parts. Another discovery was the missing lower-spring pad on the left strut indicating a poor quality repair in the past. The following picture shows the lower spring pad of the right front strut still on the spring.

Afbeelding

With both springs removed from the strut, I have access to the nut that secures the shock-absorber in the spring.

Afbeelding

My first impression is that both shock absorbers are in fine condition. They have a similar resistance to the new shocks that I installed in my E34S M5 a few years ago. But a final analysis can only be made after I have removed the inserts., something that is scheduled for next week.

raymondw
Berichten: 887
Lid geworden op: 26 nov 2006, 20:33
Locatie: NL

Re: Het verhaal achter de motorrevisie van mijn E28 M5

Bericht door raymondw » 08 jan 2011, 23:19

SteV6 schreef:Heb je de auto wel op taxatiewaarde verzekerd? Want het verschil tussen dagwaarde en werkelijke waarde ligt inmiddels zo ver uit elkaar ...
Ik heb hem i.d.d getaxeerd volgens artikel 7:960 van het burgerlijk wetboek, maar deze verloopt komend voorjaar. De vorige taxtatie bevat dus nog niet het NL kenteken en de compleet opnieuw opgebouwde motor. Op dit moment ben ik bezig met het selecteren van een erkend taxateur en met mijn onderbouwing voor al het aanvullende werk in de afgelopen twee jaar.
SteV6 schreef:Veel plezier verder met je wagen. En wie weet komen we elkaar een keertje tegen in Twente.
Wellicht. Waar in Twente zit jij?
SteV6 schreef:Las net overigens dat je een tijd terug de A31 de Oberhausen Straight noemt, maar volgens mij is dat de bijnaam van de A3 van Arnhem-Oberhausen. A31 is de Brabusteststrecke.
I stand corrected :beer:

raymondw
Berichten: 887
Lid geworden op: 26 nov 2006, 20:33
Locatie: NL

Re: Het verhaal achter de motorrevisie van mijn E28 M5

Bericht door raymondw » 08 jan 2011, 23:23

Sebring NL schreef:Het werk houdt nooit op Ray!
Nope, het is elke keer weer een doos van Pandorra die geopend wordt. Maar de meeste issues heb ik straks wel achter de rug. De achterwielophanging hoef ik dankzij het zeer goede werk van Smudde in 2002 weinig aan te doen. Dat mag best gezegd worden.
Sebring NL schreef:Volgende keer misschien een iets uitgebreidere beschrijving? :banaan:
LOL; dit zijn (slechts) mijn notities die ik later voor de werkelijke onderbouwing nodig heb. Deze is weliswaar beknopter, maar ook veel abstracter en daardoor moeilijker te lezen.

steve smith
Berichten: 4500
Lid geworden op: 14 feb 2008, 22:40
Locatie: Achter het stuur

Re: Het verhaal achter de motorrevisie van mijn E28 M5

Bericht door steve smith » 08 jan 2011, 23:56

Ray, 31 12 9 058 819 zijn de rubbers van de draagarmen, en dit deel is 520-M5. Dat het op normale modellen al niet voldoet is bekend, ik raad je ten zeerste de vol-gevulcaniseerde Meyle variant aan. Het BMW flubbertje is berekend op de krachten van 195/70 14 XWX, niet op de 225/50 16 Michelin PE2/Pirelli Zero waar jij binnenkort op rijdt.

Gebruikersavatar
Sebring NL
Berichten: 416
Lid geworden op: 31 aug 2010, 13:09

Re: Het verhaal achter de motorrevisie van mijn E28 M5

Bericht door Sebring NL » 09 jan 2011, 00:06

raymondw schreef: LOL; dit zijn (slechts) mijn notities die ik later voor de werkelijke onderbouwing nodig heb. Deze is weliswaar beknopter, maar ook veel abstracter en daardoor moeilijker te lezen.
I was joking sir.

kom je een keer langs bij ons vd zomer met said vehicle?

raymondw
Berichten: 887
Lid geworden op: 26 nov 2006, 20:33
Locatie: NL

Re: Het verhaal achter de motorrevisie van mijn E28 M5

Bericht door raymondw » 09 jan 2011, 22:10

This evening, I spend an hour in removing the shock absorber inserts from both struts to answer the questions that I asked in my reply to Davidoli. The removal of both collar nuts was rather straightforward and I was helped by their excellent condition with only a slight corrosion on the upper thread. A few whacks with the hammer and screw driver was enough to release them after which I could manually turn them out of the strut.

Afbeelding

I was stunned by the depth of the color of the inserts; I know that Bilstein paints its products yellow, but a 25 year old product with over 150k km of usage could not look cannot look that good.

Afbeelding

The markings on both struts indicate that the inserts were manufactured by Bilstein as OE-parts for BMW. A cross reference search of this part number in the parts catalogue didn’t reveal anything; however that doesn’t really surprise me as I bought #231 in 2001 and my latest parts database is many years younger (2008). I don’t think that all supersession of the parts is listed. With other words, I cannot determine the application for the shock inserts at the moment. Maybe with the older parts catalogue of which I still have a copy.
The currently listed part for the ECE and SA E28 M5 is exactly the same with exception of the last three numbers; the parts catalogue indicate 016 rather than 017.

Afbeelding

I couldn’t find date codes either so I cannot determine their age, but given their condition, I doubt that these have much mileage on them. The only other markings that I have found are shown on the following picture. I think this is a track/trace code from manufacturer Bilstein.

Afbeelding

Given their visual condition and the sealing between the cylinder and shaft, I think that these inserts will live another ten years with my usage and if I can confirm this part number to be correct for the DC91 model variant, I will reuse them.

The following picture shows the hub that contains the bearing of the left strut. The allen-bolt that secures the brake disk to the hub went off rather easy.

Afbeelding

That did not apply for the right brake disk. Its allen bolt is so tight that I could not remove it with the right tools. I need a grip-nut to loosen it. That is something for next week.

Afbeelding

raymondw
Berichten: 887
Lid geworden op: 26 nov 2006, 20:33
Locatie: NL

Re: Het verhaal achter de motorrevisie van mijn E28 M5

Bericht door raymondw » 22 jan 2011, 21:24

I picked up another stash of parts today; all for the front suspension including strut mounts.

Afbeelding

I decided against using OE thrust arms as the installed bushing is identical to the 520. Instead, I followed Stevie’s advice and ordered the Meyle HD replacements. These exceed OEM specifications and will not only last longer, but in theory also improve the steering-feel by tightening the play in the suspension.

Afbeelding

I checked the mounting holes of the new top-mounts for axial and radial play and found that none was present. This conforms that the old top-mounts have lived their lives. At around 46 Euro/each, these may be considered a bargain compared to those of its successor that retail for more than 100 Euro/each.

Afbeelding

As I was sick last week, I didn’t do much work on #231 other then about half an hour for the disassembly of the final drive on last Thursday evening . I removed the output flanges and the alloy back-cover. I drained the oil in a bucket whilst doing so.

Afbeelding

The LSD itself is huge and made from a high grade steel; it is designed to take a beating without wearing down.

Afbeelding

Although difficult to see on the preceding picture (#1), the LSD-drive sprocket shows a healthy running pattern with a correct play between the pinion-and LSD sprockets (see following chart for reference).

Afbeelding

This means that no adjustments are necessary and that the slight whining noise is caused by the output bearings. I will ask for quotes for their replacement. Before removing the LSD, bearing-caps need to be removed. I didn’t have the time for that.

Note #1: The camera I use for these pictures is a seven year old Sony DSC-F717. Although this still is a fine camera with much better optics then the bulk of today's point-shoot cameras, its optical and digital abilities is not sufficient to capture all the fine details compared to modern (DSLR) camera technology.

Gebruikersavatar
SteV6
Berichten: 3184
Lid geworden op: 06 aug 2006, 19:26
Locatie: S4 Avant, S5 cabrio, Leon V6, Speedster, Twente

Re: Het verhaal achter de motorrevisie van mijn E28 M5

Bericht door SteV6 » 23 jan 2011, 14:37

Beetje offtopic, maar ik ben ook nog steeds heel tevreden met mijn F-717 :mrgreen:

raymondw
Berichten: 887
Lid geworden op: 26 nov 2006, 20:33
Locatie: NL

Re: Het verhaal achter de motorrevisie van mijn E28 M5

Bericht door raymondw » 23 jan 2011, 15:39

SteV6 schreef:Beetje offtopic, maar ik ben ook nog steeds heel tevreden met mijn F-717 :mrgreen:
Ik ook hoor; ik gebruik hem nog steeds met veel plezier daar waar mijn Nikon D300s te lomp of te kostbaar voor is. Maar als de F717 vroeg of laat de geest geeft zal het mij echt spijten.

Marc R
Berichten: 6859
Lid geworden op: 10 feb 2006, 14:33
Locatie: Black Hole

Re: Het verhaal achter de motorrevisie van mijn E28 M5

Bericht door Marc R » 26 jan 2011, 18:10

Ik kan maar een ding zeggen na het lezen van dit zeer informatieve topic....


Damn Raymond wat ben jij punctueel! :shock:

MEGA props voor je onvermoeibare inzet. :thumbup:

raymondw
Berichten: 887
Lid geworden op: 26 nov 2006, 20:33
Locatie: NL

Re: Het verhaal achter de motorrevisie van mijn E28 M5

Bericht door raymondw » 06 feb 2011, 16:48

Due to other commitments, I didn’t spend much time on the E28S in the past few weeks until yesterday. I did find the time for a few days of skiing with five of my brother in laws though. The weather in Austria was excellent with clear blue skies and visibility of more then 100km as can be seen on the following picture. The following picture shows the Dachstein massive in the background; that with a few meters shy of 3000mtr, this group hosts the most eastern located glacier in the Alps.

Afbeelding

Yesterday, I started removing the paint from both struts. Originally, I wanted to sandblast and powder coat them; but that forced me to remove the bearings, something that would make them unusable. As I hate to waste perfect functioning bearings for just a preferred method, I decided for another solution; the good old trusted RX5 rust primer coat and black body paint from Innotec, a professional product that cannot be bought in the regular stores.

Afbeelding

Removing and sanding each strut requires about 60-70minutes with machine tools. As I use RX5 rust converter, I do not care about the residual corrosion as long as it is solid.

Afbeelding

Caprotec RX5 is not only a rust converter but also a primer coat; it just requires 24hrs of curing after which the final coat of paint can be applied. RX5 is a very low viscosity helping it to reach narrow cavities as well.

Afbeelding

After the required curing time, I applied the first layer of black coating. As mentioned, I used a product from Innotec as it is highly resistant to the hardship of outdoor use.

Afbeelding

I applied just two thin layers of coat in order to keep the thermal resistance between shock absorber and ambient as low as possible. I will allow another 24hrs for curing before deciding weather or not a third layer is required.

raymondw
Berichten: 887
Lid geworden op: 26 nov 2006, 20:33
Locatie: NL

Re: Het verhaal achter de motorrevisie van mijn E28 M5

Bericht door raymondw » 06 feb 2011, 18:48

I also removed both bearing houses of the LSD. These need to be driven out from the cast-iron final drive enclosure. The following picture clearly shows the spacer ring. When replacing these, one has to order a complete set of varying thickness as this parameter alone determines the clearance of the LSD its needle bearings.

Afbeelding

The removed bearing houses directly after their separation from the final-drive enclosure. Note that the oil-retaining seals are still installed.

Afbeelding

With both needle bearing-houses removed, the heavy LSD can be taken out as well. Clearly visible are its needle bearings. Directly after its removal, I packed the LSD in a plastic bag and sealed it to prevent contamination.

Afbeelding

The hypoid pinion wheel; The exact position of this part is the reference of the final drive; therefore, when there is no need to replace the bearing, leave it as is. Reinstalling this part requires special expensive tooling and is a specialist job. When the clearance isn’t tight, you’ll risk a noisy final drive.

Afbeelding

Now, I can prepare the enclosure from sanding to remove the existing rust. I have yet to decide about the finish of the cast-iron enclosure. I want a durable finish; POR15 can be applied, but also adds a thick layer, increasing the thermal resistance to the ambient. Some research is required in this field.

Gebruikersavatar
Niall
Berichten: 1664
Lid geworden op: 27 nov 2007, 09:15
Locatie: Woonplaats

Re: Het verhaal achter de motorrevisie van mijn E28 M5

Bericht door Niall » 06 feb 2011, 19:57

Uit ijn ervaring weet ik dat er 2 mogelijkheden zijn voor een duurzame corrosiewering voor zulke delen.

1 : Zuur Zink Nickel met of zonder topcoating zoals een poeder
2. Sheradiseren met een topcoating zoals poeder

De eerste kunnen ze meende ik voortaan bij Galvano Hengelo, de andere kan bij een bedrijf in helmond.
Probleem is dat gietstaal moeilijk te verzinken kan zijn

raymondw
Berichten: 887
Lid geworden op: 26 nov 2006, 20:33
Locatie: NL

Re: Het verhaal achter de motorrevisie van mijn E28 M5

Bericht door raymondw » 13 feb 2011, 14:44

After a few days, the’ innotec’ paint has cured into a nice black finish that has a very high resistance to scratching and protrusion.

Afbeelding

Normally, the struts need to be filled with oil before inserting the shock-inserts; however, the outlined section in BMW’s repair instructions clearly prohibit this for gas-filled shock absorbers such as the Bilstein’s as used on the E28 M5.

Afbeelding

With other words; simply dry-insert the yellow Bilstein’s.

Afbeelding

As can be seen on the following picture, the seal of the old threaded ring is completely worn, hence the 25 Euro per threaded ring is worth the effort.

Afbeelding

Compared to the threaded ring for the (Sachs) shock absorber as used on the E34 M54, the Bilstein threaded ring is hideously expensive. However, the Bilstein threaded ring contains a seal providing for a double protection for the shock absorber’s internal parts. The specified fastening torque is 130Nm to fully secure the position of the insert in the strut.

Afbeelding

The new strut-mounts and spring plates with the associated spacer rings and protective covers.

Afbeelding

The springs for the E28S M5 are stiff and cannot e compressed without using spring compressors.

Afbeelding

Whilst turning-in the M14-nut to secure the top-mount to the piston of the shock-absorber, the new protective boot around the piston was twisted. I’ll correct that once the struts are refitted to #231 in a later stage and I can tighten it to the specified 80Nm.

Afbeelding

One strut done; one to go!

Gebruikersavatar
G Kolkman
Berichten: 2636
Lid geworden op: 25 feb 2007, 11:40
Auto: Miata (2x..) /E30 rally /S2000
Locatie: Eindhoven

Re: Het verhaal achter de motorrevisie van mijn E28 M5

Bericht door G Kolkman » 13 feb 2011, 20:09

Waarschijnlijk ter overvloede maar niet vergeten wat olie in de veerpoot te doen he :) .

raymondw
Berichten: 887
Lid geworden op: 26 nov 2006, 20:33
Locatie: NL

Re: Het verhaal achter de motorrevisie van mijn E28 M5

Bericht door raymondw » 13 feb 2011, 20:32

G Kolkman schreef:Waarschijnlijk ter overvloede maar niet vergeten wat olie in de veerpoot te doen he :) .
Dat dacht ik eerst ook; todat ik de reparatie instructies nalas. Bij gasgevulde dempers mag er geen olie toegevoegd worden. :wink:

Plaats reactie

Wie is er online

Gebruikers op dit forum: Amazon [Bot], Eric Z, Mark 320iS en 5 gasten